

Webflow

The Simplest Table of Contents in Webflow — No Custom Code

The Simplest Table of Contents in Webflow — No Custom Code
Table of contents — what it means
A table of contents gathers in-page links to each section so readers of a blog post can jump straight to what they want to see. In Webflow it can be built without custom code by splitting the CMS rich text and assigning IDs.

Note: the steps and screens in this article are as of 2021. Names and placement may have changed in Webflow’s current UI.

Hello. This is Masato.

Recently, while writing blog posts, it struck me that “it would be better if a table of contents let you jump straight to what you want to see.” An idea worthy of Edison. So this time I am going to build a linked table of contents using the Webflow CMS.

But what is this… you cannot make in-page links inside a Webflow CMS rich text field. Or rather, first of all, you cannot assign IDs inside rich text. So this article introduces a way to build a table of contents with in-page links for blog posts made in the CMS, using the CMS somehow or other and cutting the amount of work down as far as possible.

To describe the method roughly: build the list and the links outside the CMS and make everything else in the CMS. Split the rich text inside the CMS, assign IDs, and jump to them with links. Let’s build it so the table of contents can be made from within the CMS, without editing every page.

Saying that probably does not make much sense, so let’s just build it.


↓ This is the table of contents whose construction I will explain.

Building a table of contents in Webflow: start with the foundation

There are, fundamentally, several ways to build a website.

This time I am going to build it with the following points in mind.

  • Do not use any extra custom code
  • Complete it with features inside Webflow alone
  • Keep the number of steps as low as possible

Add a list and start building

Let’s start with the foundation.

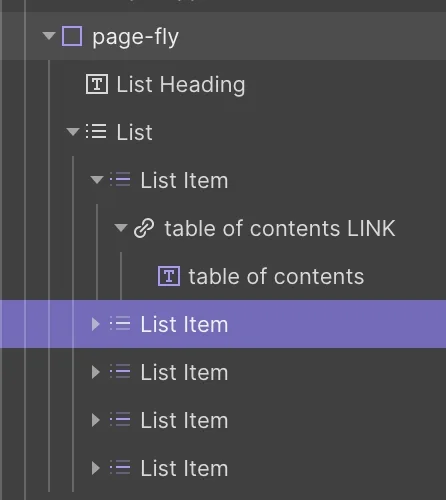
  • Assemble the elements using the Navigator as your guide.
The screen where a List element is added to build the foundation of the table of contents
Built using the code as a guide

Once you have made one list item, copy it up to five as in the image.
Note: increase it to however many table-of-contents rows you want. You will use each of them later.

Building a table of contents in Webflow: split the CMS by section

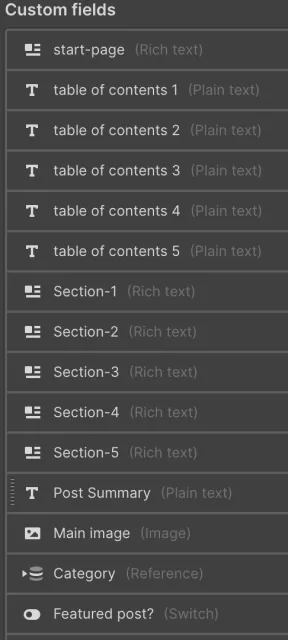
The screen where custom fields for each section are added to the CMS
CMS content

What the CMS behind your own blog looks like will change how you should build this slightly, but if you are thinking “I have no idea,” just copy what I do here.

What matters here are these two items ↓

  • Table of contents. This is the field where you enter the text you want shown in the table of contents. The code we write for the web is in English, so English is what I use here as well.
  • Section 1 to 5. These are the items used to give each section an ID so the table of contents can jump to it. If you are already writing your blog, try breaking it apart section by section.

Assign IDs to the text

You need to add as many elements as the rich text fields you added in the CMS. Why split it and add more? Precisely in order to assign IDs. Give each rich text field you added an ID.

How to assign an ID

Some people may be thinking “I do not know how to assign an ID,” so here is a quick word on it. (I had to hunt for it at first too.)

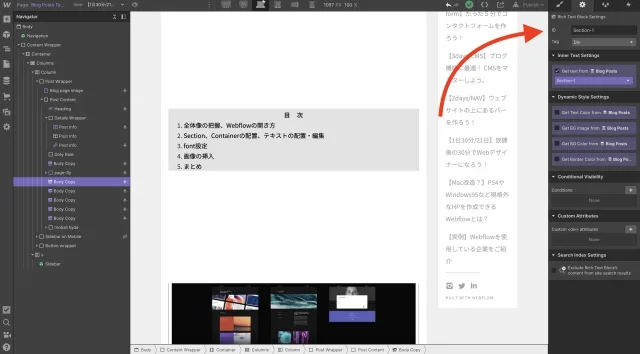
Where the ID (anchor) is set on an element
Assign the ID from the top left

The ID appears at the very top when you select the gear icon at the top right. Give each section the same name as its CMS field. (Table of contents 1 to 5.)

Incidentally, I find it off-putting when the table of contents sits right at the top, so I have made a heading field for the H1 and the lead paragraph. That makes six rich text fields in total. If you want more sections, add them the same way. Making a lot of sections causes no problem at all for the design. (It might get heavier, but it will probably be fine.) Set the number that suits your own blog.

All that is left is adjusting each setting

  • Bind the CMS to the table-of-contents text. Set Table of contents in order
  • Set the links to jump to the in-page IDs. Set each Section
  • Bind the CMS to each rich text field

That should have built a table of contents that jumps to the sections in the page. But there is one problem here.

Because the List itself is not built in the CMS,
if you have a case where there are only three sections, you end up with blank table-of-contents rows.

The setting that solves this error is
‍Conditional Visibility.
‍It sounds oddly grand written out in full.

In short, the one below.

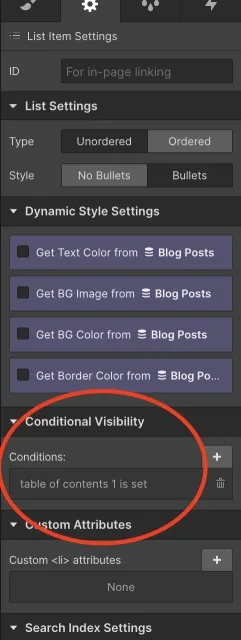
Where Conditional Visibility is set
In this image the first List item is selected.

What you can set here is “under what conditions this element is displayed.” The setting in the photo above says ‍“display when Table of contents 1 has been filled in.”

Apply this setting from the top down, matching the numbers 1 to 5. (For example, set List 2 to “Table of contents 2 is set.”)
With that in place, rows with no input are not displayed, and when there are three sections only three table-of-contents rows appear.

One extra thing

Applying the same setting to the Div block that wraps the whole table of contents also helps when making pages with no table of contents at all. In that case you simply leave Table of contents empty, which is easy enough.

After that, change the background of the table of contents, the text color, remove the underline, and restyle it however you like with the CSS features, and it is finished.

Can you make links that jump within the same page from the middle of the text?

You can, if you split the CMS with the method above. But because you have to split the rich text of your body copy, it is quite a chore. For now I think there is no easy way to set it up. (If there is, please tell me.)

That said, it looks like it would be easy with custom code (ha). I will write an article about custom code at some point, so please wait for it. First I want to look for ways to make the most of no-code, since we have it.

Summary

Let’s go back over the work we did this time.

  • Insert a list to build the foundation
  • Create a field in the CMS for the list titles
  • Split the CMS content section by section
  • Insert rich text on the code screen and assign IDs
  • Bind the CMS link and text features to the list
  • Set it to display only when the list row has input
  • Restyle the list

For anyone who does not have many articles yet, or who is about to start a blog, putting this setup in place is one option. If you want to use custom code, please wait a little. Custom code brings things like “you cannot see the effect until you publish to the web” and “the level goes up a bit,” so for now I want to use no-code to the fullest.

Next time I will bring you “changing text color in CMS rich text, and drawing a colored underline under text.” It is an overwhelmingly easier bit of brute force than making links. Personally I think “this will do!” (Although it might affect SEO and so on.)

Let’s all keep at it. Rest when you are tired. I would be glad to hear how you are getting on. I will keep at it too. See you next time.

Note: the finished result is the table of contents on this blog.

FAQ

Can in-page links be made inside Webflow CMS rich text?

IDs cannot be assigned inside rich text, so in-page links cannot be made as things stand. Splitting the rich text section by section and assigning IDs makes it possible to jump to them from a table of contents built with the CMS.

Can a table of contents be built in Webflow without custom code?

It can. Build the list and the links outside the CMS, prepare a Table of contents field for the table-of-contents text and Section fields for the IDs in the CMS, then assign the split rich text fields IDs with the same names as the CMS fields and bind them.

What should I do about blank table-of-contents rows on pages with few sections?

Set Conditional Visibility on each list item so that it is displayed only when it has input. Applying the same setting to the Div block that wraps the whole table of contents also helps when making pages with no table of contents at all.

Can links that jump within the same page be made from the middle of the text?

They can if you split the CMS rich text, but it takes a great deal of work. For now there is no easy way to set it up, and it looks as though custom code would make it simple.

What should I keep in mind when building a table of contents in Webflow?

Three things: do not use extra custom code, complete it with features inside Webflow alone, and keep the number of steps as low as possible. Copy the list item as many times as the number of table-of-contents rows you want.

A Webflow site people find in search, and your team can update.

Webflow site production from ¥1,000,000 (excl. tax), about 1.5 to 2 months. Questions from readers who got stuck are welcome, free of charge.

The author of this article (who writes this Webflow blog) personally handles everything from consultation to delivery and operation. The price never changes after we start.