

Webflow

How to Connect a Custom Domain in Webflow (Beginner Guide)

How to Connect a Custom Domain in Webflow (Beginner Guide)
Setting a custom domain in Webflow — what it means
Setting a custom domain in Webflow means subscribing to a Site plan (from $14 at the time of writing; from $15 after the May 2026 revision) and connecting to Webflow by registering three DNS records — A, CNAME and TXT — at your registrar. It takes roughly 15 minutes across four steps.

Note: the steps and screens in this article are based on the Webflow dashboard as of December 2024. (2026 update: names and placement may have changed in the current UI.)

This article answers that question.

Webflow updates constantly, so by the time you read this the details may have shifted slightly. If something here does not work, check the official site and try that, or get in touch through Twitter.

Let’s get straight into it.

Reference: the official Webflow site → Connect a custom domain (in English)

Which plan do you need, and how long does it take?
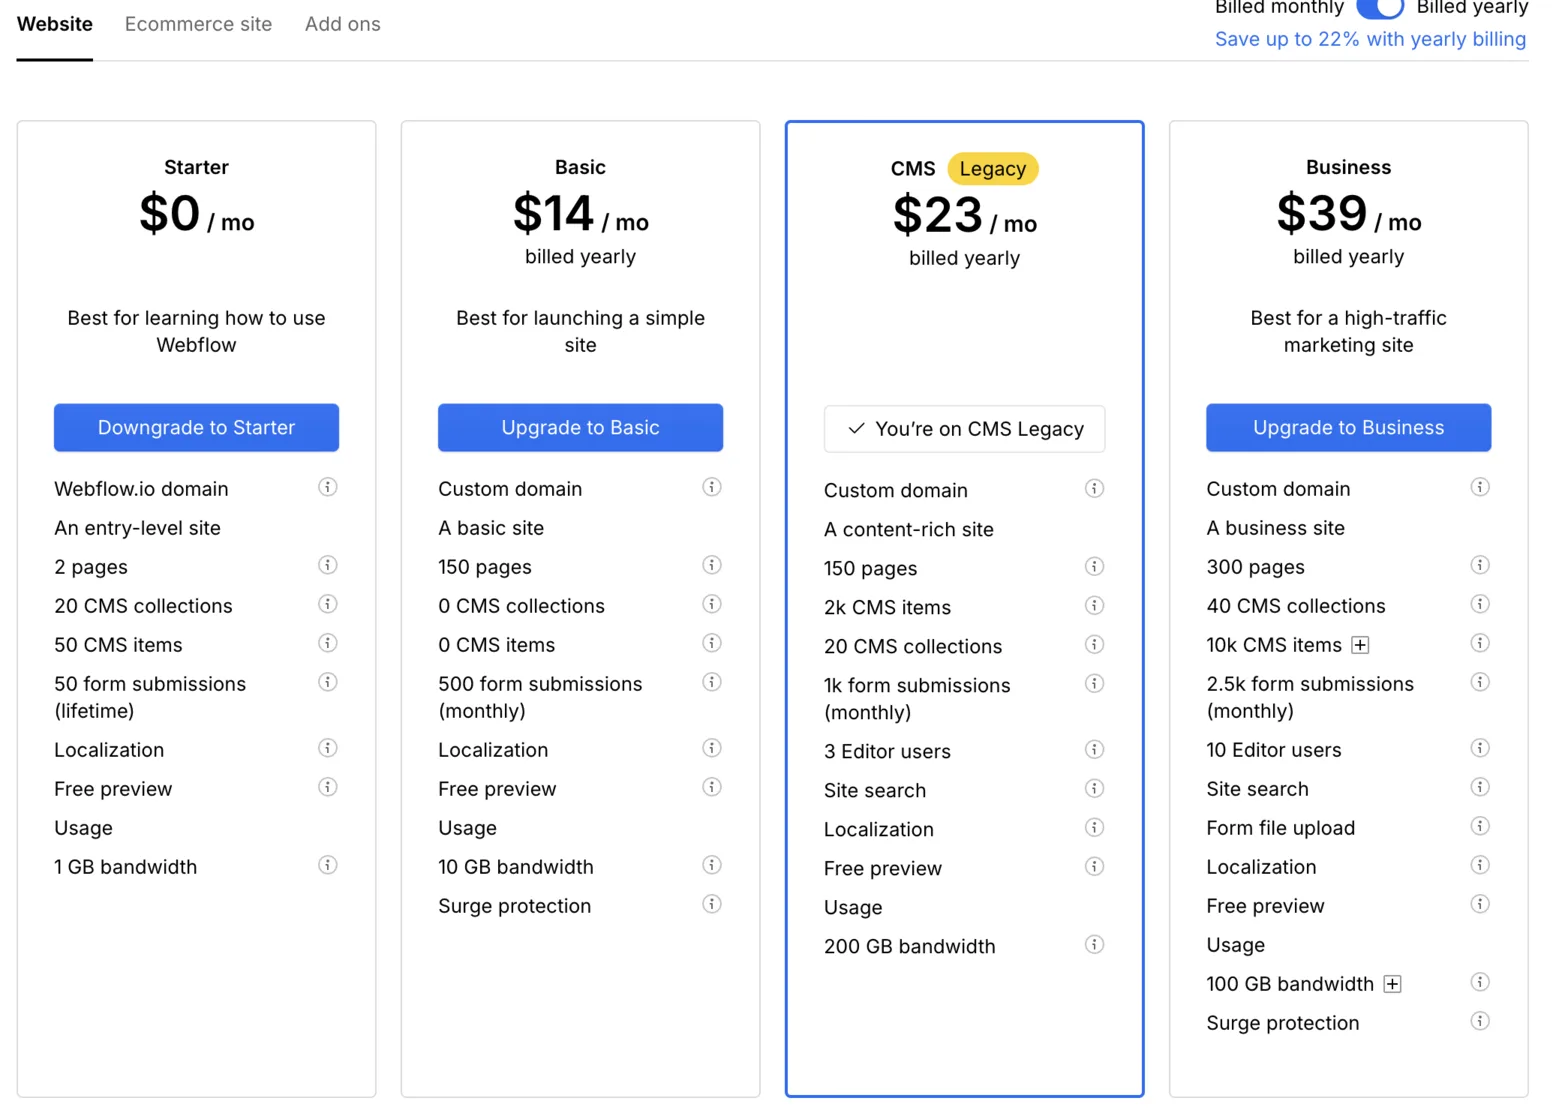
The pricing plan screen for connecting a custom domain in Webflow

Pricing: from $14 a month at the cheapest

To set a custom domain in Webflow you need a Site plan. A Workspace alone cannot set a custom domain.

  • Site plan from $14: required for a custom domain

(2026 update: after the May 2026 pricing revision, the cheapest Site plan that allows a custom domain is Basic at $15 a month, billed annually.)

If you are only building your own company site, a Site plan alone is enough to work in Webflow. Use a Workspace plan when you want to run several projects in Webflow.

How long the domain setup takes

Setting a custom domain takes about 15 minutes. Just four steps. They are explained below, so let’s work through them.

How to set a custom domain in Webflow, with Japanese registrars covered

Here is the procedure when you have bought your domain at a Japanese registrar. Japanese registrars cannot be linked through the one-click convenience feature in Webflow, so you have to use the manual option and set the records by hand.

The steps are as follows.

  • [Step 1] Buy the custom domain
  • [Step 2] Add the custom domain to Webflow
  • [Step 3] Set the DNS records Webflow needs
  • [Step 4] Set the custom domain as the default

[Step 1] Buy the custom domain

When buying a custom domain, pick a registrar you can trust. Compare prices and support, and choose the one that matches your needs. Once you have bought it, open the domain dashboard and make the settings you need.

Among Japanese registrars, I personally recommend Onamae.com — everything about it felt relatively simple and straightforward.

If you do not mind a registrar outside Japan, I recommend Cloudflare.

Cloudflare is a company providing services that improve the performance and security of websites. It has a wide range of features, notably a content delivery network (CDN), protection from DDoS attacks and SSL certificates. That means faster page loads and stronger security. Using Cloudflare also makes managing a domain more efficient, and the user experience should improve with it.

That is a lot of jargon, but in short, it can make your site display somewhat faster. Plenty of Japanese companies now use it, and you have probably seen the logo below when visiting a site. (It sometimes appears during a security check.)

The Cloudflare security logo shown while a custom domain is being connected

What makes a good domain name?

Domain names are said to have no effect on SEO. As a rule, set whatever name you like. Here are a few tips for choosing one.

  • Keep it as short as possible
  • Make it obvious at a glance
  • Never put another company’s name in it (webflow-japan, wix-design and the like)

Keep those three in mind.

Putting a hyphen between words, as in domain-dondon, is apparently common among Japanese owners. Outside Japan the aim is to be as short as possible, and I hear even the hyphen gets cut.

Putting another company’s name in it is absolutely not on. It looks like nothing but a scam site, and above all, each company prohibits it. (Everyone can see that selling Apple products from a domain like apple-japan would be out of the question.)

[Step 2] Add the custom domain to Webflow

(2026 update: the button names and screens below are as of the time of writing. They may have changed in the current UI.)

Buying a Site plan is what unlocks custom domains. Add yours from “Publishing” in Webflow.

Click the blue “Add a custom domain” button to the right of “Production” to begin. Several options appear; click “Manually add domain” and enter your custom domain.

Webflow then shows the values you have to enter by hand. Take those to your registrar.

[Step 3] Set the DNS records Webflow needs

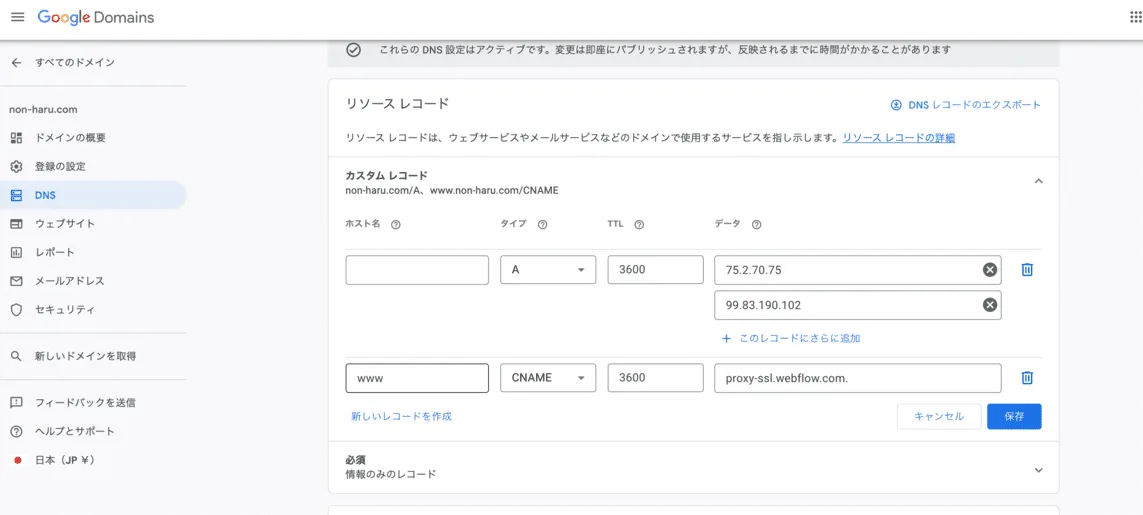
The screen for setting the DNS records Webflow needs

Set the custom DNS at your registrar. Create three custom records and choose the types “A”, “CNAME” and “TXT”. Using the image as a guide, copy and paste the values below.

  • “A” 75.2.70.75 99.83.190.102 ‍
  • “CNAME” www proxy-ssl.webflow.com ‍
  • “TXT” one-time-verification=01ab2345-cd67e-89f0-11gh-12i13456j789k ‍

Set all of them. The values above appear once you have entered your domain in Webflow in step 2, so use the ones it gives you.

Some Japanese registrars cannot set all of the records above. In that case you inevitably need Cloudflare to add the DNS. (You can use Cloudflare for the DNS settings alone, without managing the domain there.)

What to do at each Japanese registrar is collected in the article below.
→ Japanese registrars: how to fix a domain that will not connect to Webflow

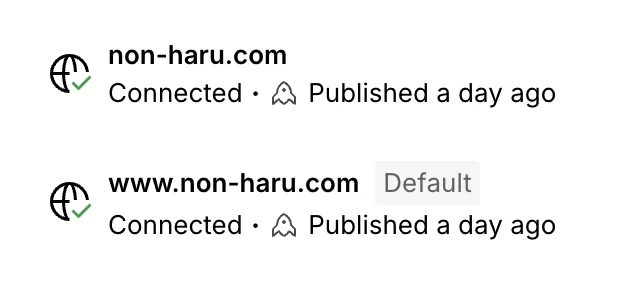
Once the settings are in place, go back to Webflow. When your custom domain reads “Connected”, you are done.

If the domain still will not connect after all of the above, we can support you with the connection. Get in touch if you are stuck.

The official Webflow site → Connect a custom domain (in English)

[Step 4] Set the custom domain as the default

The screen for setting a custom domain as the default
Quoted from the official Webflow site

Finally, set a redirect so every URL resolves to one address. Set the “www” domain as the default and you are done.

The screen where the www custom domain is set as the default to unify URLs

While you are there, use the “SEO” section to stop the Webflow.io subdomain being indexed.

Last of all, type your domain into Google search and check that the site loads. If it does, the custom domain setup is finished.

Depending on the registrar, DNS can take around 24 hours to propagate.

What to do after setting a custom domain

Once the custom domain is set, publish the site and start checking your SEO rankings and click counts. The main job is setting up the following tools.

  • Analytics
  • Search Console
  • RankTracker (or another SEO rank checker)

Use these tools to track traffic and improve your content.

Traffic does not grow straight away when you publish a site. Focus on the SEO rankings alone and keep at it patiently. Explaining how to use the tools here would make this article long, so each setup and workflow gets its own article.

If you cannot set a custom domain in Webflow

“Customizing the DNS” sounds difficult, but in practice it is only copying and pasting, so it turned out to be easy. If you cannot get a custom domain set in Webflow, we can solve it — talk to us first.

The official Webflow video below (it is old)

FAQ

Which Webflow plan do I need to set a custom domain?

You need a Site plan (from $14). A Workspace alone cannot set a custom domain. If you are only building your own company site, a Site plan on its own is enough to work in Webflow.

How long does it take to set a custom domain in Webflow?

Roughly 15 minutes, across just four steps. Depending on the registrar, though, DNS can take around 24 hours to propagate.

Can Japanese registrars be linked to Webflow?

They can, but not through Webflow’s one-click convenience feature, so you have to use the manual option and set the DNS by hand. Some registrars cannot set every record required, in which case you need Cloudflare to add the DNS.

Does the domain name affect SEO?

Domain names are said to have no effect on SEO. As a rule, set whatever name you like — keep it as short as possible, make it obvious at a glance, and never put another company’s name in it.

What should I do after setting a custom domain?

Set up three things — analytics, Search Console and a rank checker such as RankTracker — and improve your content while watching traffic and SEO rankings. Also check that the webflow.io subdomain is set not to be indexed.

A Webflow site people find in search, and your team can update.

Webflow site production from ¥1,000,000 (excl. tax), about 1.5 to 2 months. Questions from readers who got stuck are welcome, free of charge.

The author of this article (who writes this Webflow blog) personally handles everything from consultation to delivery and operation. The price never changes after we start.